


Part 1 | Part 2 | PART 3 | Part 4
NOTE:
also see the Interactive Map for this hike or the Video Trip Report.
Day 9:
 Woke up to sunshine and promptly got out all my wet gear to get it dry before going back into my pack. The shortcut route down to Poison Canyon was a bit of a slog, but it was better than walking along the highway to upper part of the wash.
The Jeep road through the upper part of the canyon was more traveled than I remember. It’s a nice canyon as it winds through the entrenched slickrock. I’d love to spend some time exploring the side canyons. The day turned warm quickly and I found myself hiding in shadows for restbreaks for the first time since Day 3.
Soon I reached the first water in the canyon. There were some cool petroglyphs at this site. I believe these are the ones Kelsey mentions, but they aren’t accurately noted on his map.

At little farther down canyon I stopped for a short break under some cottonwoods. As I got up to walk again I realized that I had somehow lost my bandana in just the few minutes I’d been there. The wind was gusting and evidently it blew away my bandana away while I wasn’t paying attention. It couldn’t have gone very far — but for the life of me I couldn’t find it. It was a tan bandanna and among the sand and brown cottonwood leaves it was impossible to find. I finally had to give up and move on. Very frustrating!
Just a bit farther I got to the pipe spring in the middle section of the canyon. Awesome water — I drank it straight from the source and filled up all my bottles.
As I neared the Black Jump the stream dried up — though there were still potholes right at the jump itself. I left the Poison Spring Canyon road and followed the old miner’s road along the northern rim of the canyon. It seems like it wouldn’t take much of a storm to completely wash away this old route. The balanced boulders and petrified wood make for an interesting walk. I made my way all the way up to the overlook of the Dirty Devil and found a great campsite. Even though the road seemed more traveled than 4 years ago — I didn’t see one vehicle since crossing the highway the day before.

 Day 10:
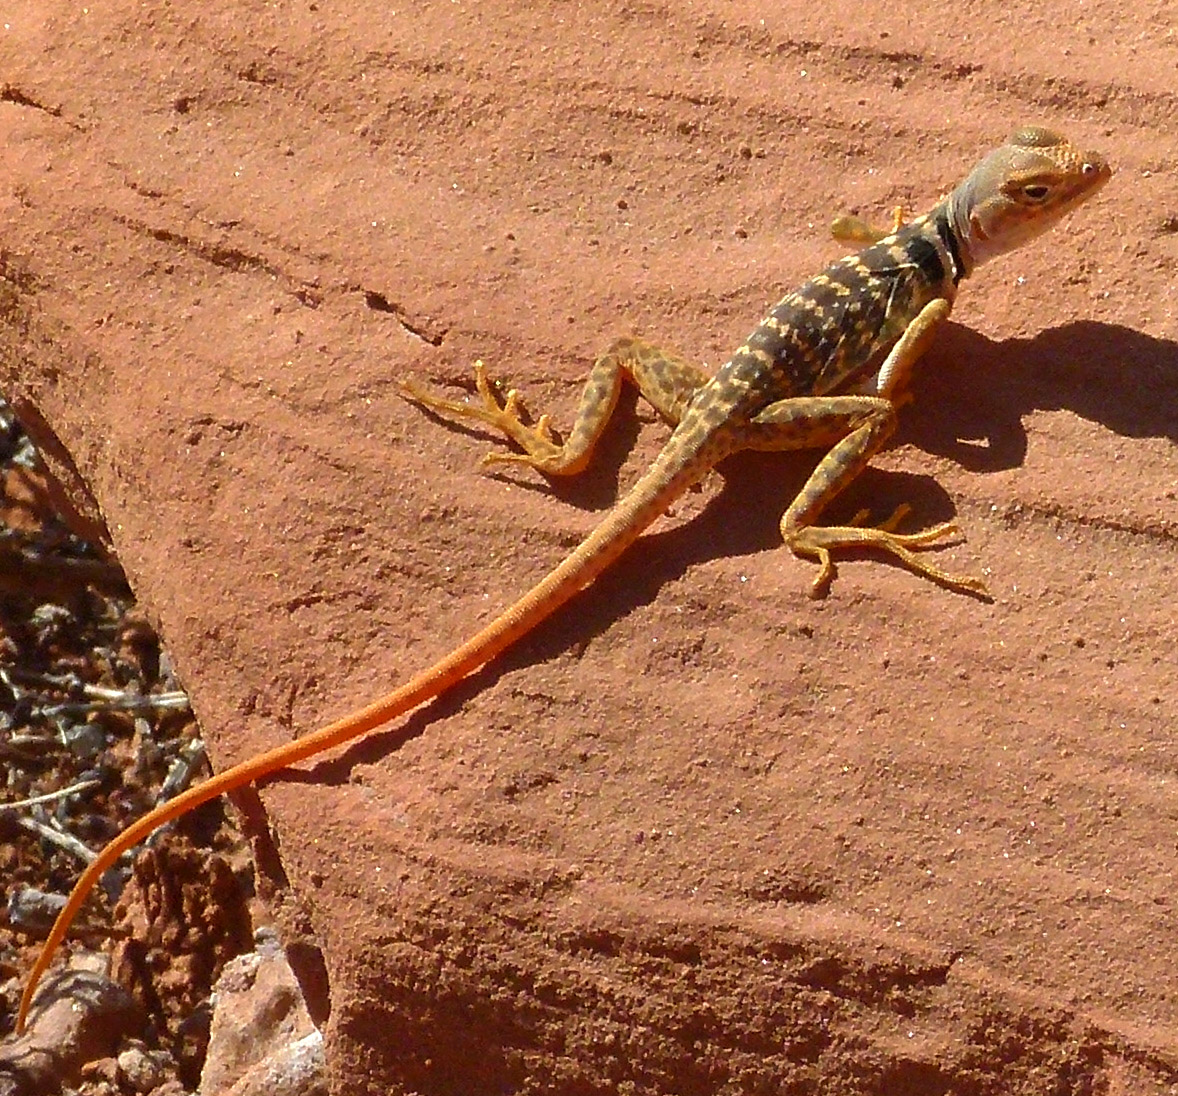
Next I continued along the old mining route past the point that 4WD can navigate. The route from here is still well traveled however by hikers. It is easy to follow, though from a distance it looks like it would be impossible. This section continues to have plenty of balanced boulders, petrified logs and an occasional collared lizard. From a point farther north I dropped down to the Dirty Devil. The route down was a little trickier than I remembered, but not too difficult with a little patience. Within 30 minutes I was to the bottom on the muddy shores of the Dirty Devil.
The river looks daunting with its opaque chocolate milk flow nearly 40 feet across. The first few steps were nervous ones, but after that I realized the water didn’t get deeper than my shin and the crossing was easy. Actually, not getting stuck in the mud on the exit was the most difficult part.

Making my through Happy Canyon Narrows was awesome once again. This really is one of more photogenic slot canyons around. Last time I was here it was raining so a) I had to rush and b) there was not ample sunlight to illuminate the slot. This time the sun was out and the slot was glowing. Almost too much in fact, as direct sunlight was hard to avoid in some spots (I know… I’m a perfectionist!)

I was surprised to find no water in the lower end of Happy Canyon. Just as I was getting nervous about not packing enough of the muddy stuff from DD, I came to a few small potholes. Then some more. Though stagnant, the water was clear. I dumped the muddy stuff and replenished with slot water.
 Near the top of the slot there was quite a bit of water. So much that after a while there was no avoiding it and one had to wade through shin deep water to continue. About ¼ mile from the top I climbed out a wall of the canyon to the north rim. I remembered that at the very top was a dryfall that was somewhat difficult last time solo with the big pack. It was refreshing to get a different view along the rim — and I could see the rock formation called The Pinnacle in the distance.
The walk up the middle part of Happy goes fairly fast. Though it’s a winding canyon, it’s wide open with good footing. I was anxious to get up to the middle section where I had found water the last time. After a few hours of hiking I was to that spot and to my surprise… NO water! There was another water hole a little farther up so I anxiously pushed on. Once there… NO water! Now… I’m was getting a little concerned once again. Happy Canyon is fairly dry, but this outbreak has been documented by several travelers over the years including myself in 2009. I still had water, but it would make for a long trek out if I didn’t find more before getting up into Canyonlands. I would have to ration what I had at camp that night.

Day 11:
Mid-Happy Canyon is a really ‘nice’ canyon. I may over-use this word, but it seems appropriate here. Majestic Wingate sandstone walls tower above the winding lower canyon. This area is completely unspoiled and though not as amazing as Canyonlands proper — it’s just nice.
As I approached French Canyon spur where I would turn, I was contemplating a side-hike about ½ mile up to the South Fork of Happy where I found water on my previous visit. It was out of the way, but I really would like to have more water for my climb out of the canyon. But, the canyon was so dry, would there even be water there this year? As I was evaluating the pros/cons as I walked, all of a sudden I came upon as very small outbreak of water. I’m fairly certain this was not here before, but I was grateful to have the water. Then, as I started up French Canyon I soon came to several tanks of water where the wash cut through some sandstone. Now I had plenty of water and I was glad as it was shaping up to be a warm day!
I was a little nervous about the route out of French Canyon. I’d only read one report on the route and it was filled with some expletives. Kelsey’s guide on the area didn’t make it sound too tough — but that doesn’t always mean much for sheer cliffs give him barely a pause! So I pushed on to see too how the climb would unfold.
While sill in the lower reaches of the side canyon the route was quite a challenge as the wash was filled with huge boulders. Route-finding up and over and around them took substantial work just to get past each bend of the water course. Looking ahead I could finally see the talus slope on the right that I would ascend and the ‘notch’ ledge where the route travels:

Finally I spotted a cairn on the south side of the wash and a faint trail made its way along the bank. This too wasn’t a walk in the park as it was still rough terrain, but much easier than climbing over the boulders. Soon, the faint trail broke away from the wash and climbed a steep slope. A few spots the route was easy to lose as it climbed though very steep talus and rocks. But, seeking out the path of least resistance would time and time again put me back on the little-used trail. The upper-most portion of the route included some old construction by cattle runners to get the route up to a solid ledge. From here it’s an easy walk around the bend with great views back down canyons.

Farther up the route doubles back before climbing once again up a few more ledges — I don’t see how cows ever did this! Without too much more effort I was up on top.
Well… not completely on top. I was up on the upper rim, but there was still a ways to go thought undulating Navajo Domes to make it to the true top. I didn’t have exact notes for this section as it was supposed to be much easier than the lower section — but I do remember a generally note to stay south out of the main watercourse. Well… I think I took this to an extreme as I ended up wandering a circuitous route through domes on the eastern ridge which I believe I made harder than it needed to be. The views were great though: Upper French Spring Canyon on one side (I actually spotted the Hans Flat station across the canyon!) and rolling sandstone domes on the other side:

I finally picked up the 4×4 road and from here high-tailed it toward the station. I was pushing it hard because I really needed to get there to pick up my permit before they closed down. I didn’t know what time that would be, but I pushed to get there by 5pm.
I took one small cross-country shortcut that probably didn’t save me much time as much of it was through deep sand. I pushed on, but I was beat — it had been a long day.
I ended up getting to the station at 5:10 and it was closed up with no rangers in sight. Turns out they closed at 4:30 so I wasn’t even that close. I was also bummed that there was no water here! BUT… there was a nice fellow named Wolfgang in his SUV contemplating where to camp for the night. He offered me a beer as we swapped stories. As we contemplated each of our next steps… an NPS intern came by. She was awesome and agreed to go get the official ranger from the nearby living quarters. Long story short… they were incredibly helpful.
Permit in hand, I walked the road down towards Canyonlands proper. I stopped at Millard Canyon Overlook to take in the view. Not too shabby:

Next I stopped at French Spring to fill up my water jugs. I was very disappointed in this water source. I guess it’s reliable — but there’s not much there and it took a long time to fill the jugs from the tiny seep. Based on all the old-timer waterworks at the site, the spring must have been much better back in the day.
I spent the night at a camp overlooking North Canyon. Wolfgang camped not too far away at the North Canyon car camp so we chatted a bit more over dinner. I wondered how a guy from Montana got the name Wolfgang — turns out he was born in Germany!
Day 12:
 In the morning I hike down the steep trail down North Canyon. Wolfgang actually ended up joining me for this section. At the bottom of the descent, Wolfgang hiked on ahead and I stopped to fill up with the water at the semi-reliable potholes. It was getting warm out and I knew the hike ahead was going to be a long one. I got as much water as possible and charged batteries via solar panel for a while. I would later see Wolfgang again as he returned from his day-hike and I continued out to the Maze.
I found one more water source as I got close to the road. At one time I heard distinct voices not too far from my location, but I never spotted the other hikers.
Once on the road my speed picked up, though the mid-day sun was very warm. I was happy to see water in the potholes once again at the turn-off to Horse Canyon. I stopped in one of the few shady spots as I filtered more water. From there I walked the road a bit farther enjoying the views down into the canyon, before leaving the road to go cross country once again for a shortcut to the Maze.
The shortcut climbs up on this mesa instead of following the jeep trail going around it. Once I got to the far side the view down into the Maze was amazing. I hoped to get here before sundown so that I could enjoy the view — and it was spectacular. Though I still had a long ways to go before camp, I dropped gear for a while to take some pictures. I also tried send some messages via my phone as this is a rare place to have Verizon voice/data service. BUT… my camera battery was nearly dead. I tried to charge the batteries again via the solar panel as I took some pictures, but it didn’t get enough juice in the late-day sun.
I still had a long ways to go, so I hurriedly packed up and climbed down off the mesa and over to the edge of the Maze — such a great place. Both car camps were taken. I waved to the people there, but pushed on w/o any real socializing.

 The climb down was much quicker than my first time on this route. This is such a fun and scenic route though — one shouldn’t rush it. On the way down I ran into the intern and ranger from the day before. They were helping a third woman get up one of the tricky climbs on the route. They were surprised I was doing it solo with the big pack, but they said they could tell I knew what I was doing. In fact, I climbed down and let the lady climb up on my back to get over the tough climb. Teamwork! From there I pushed on tossing my bag down a few spots as I climbed down. My poor bag sure did take a beating as I was in a hurry to get to the bottom before dark.
I made it — and got more water at the spring which was just up canyon from the descent point. Backpackers are not allowed to camp in this area though, so once the jugs were full I pushed on to the heart of the Maze. By the time I got to a good camping spot it was nearly dark.
It had been a long day, and I knew I’d have a long day the next as well as I really wanted to take the longer route through Water Canyon to Spanish Bottom. This route has alluded me on my previous visits to the Maze. It had been planned, but always seems to get cut due to some reason or another. With another hard day, I thought I could make it happen this time.
Thinking through the possibilities as I was getting ready to fall asleep in my tent, I realized… I’d left my solar panel charger up on TOP of the mesa. Ug! Now not able to fall asleep, I contemplated what I should do. Should I just leave it? No… I quickly decided… even though I had another big day on tap, I knew I had to go back and get it. Not just for the use/expense of the item, but because it was the right thing to do. I knew this would mean once again Water Canyon would have to wait for another year. So…
Day 13:
 Early morning I set out with just one liter of water and a camera. This was my first time climbing UP the Maze Overlook route. And by the time I’d done the round trip I’d say I know every inch of the route fairly well: Up the sand hill, up the Moki Steps (pictured) around and about, up the crack, up the second crack, over to the crazy climb and ledge walk, up through the pothole, up the steep slickrock, around and over to Nuts and Bolts and the climb out to the rim! Then… all of that in reverse after the jaunt to the mesa to pick up the solar panel which was still right there were I left it (and now facing the wrong direction to do any good!)
Back in the bottom I packed up camp and made my way to the other spring and dropped the pack and filled up water again. Though I was going to go out the Pete’s Mesa Ridge route, I decided to take the short side hike to the Harvest Scene petroglyph panel. I’d seen it before it and it was amazing with its life-size pictographs; I just couldn’t pass up a chance to see it again despite being already behind schedule. So, I pushed hard through the heat and checked it out. It was as cool as I remembered, but it was like an OVEN there with the sun directly hitting the walls and reflecting up from the sand. This made for terrible pictures as everything was washed out. I was glad I got to see it again, but I stayed for less than 5 minutes as it was so miserable in the heat and I knew I needed to push on. Here’s a picture from 2007 under better conditions:

Back at my pack and full of water, I set up the canyon which would lead to the Pete’s Mesa Ridge Route. I had never hiked this route so I was excited to see how it would compare. The route up was still steep and fun, but quite a bit easier than the Maze Overlook or Chimney Rock routes.
Once up on top the views were again amazing: Looking back into the Maze and into Jasper Canyon and all the way to the Needles and the La Sal Mountain — incredible views. Though I love the hike through the Maze and the climb up the Chimney Rock exit route, I think I would recommend this alternative just for the great views along the ridge route. The only downside… it was HOT with not a lot of shade. But, the awesome views made up for it. There was even a little arch along the way:

Once at Chimney Rock I picked up the 4×4 road and headed to the Dollhouse. This is a fairly uneventful walk, but it’s still has a sense of awesomeness with the great vistas in every direction and just that sense of being so ‘out there’ like so few other places. It also helped that it had clouded up and thus cooled down a bit. An hour or so later I was at the Dollhouse and ready to do the amazing climb down to the Colorado River at Spanish Bottom.
Once at the bottom I met a cool family from Canada. They were just ending a float trip down the Green River and were meeting the same outfitter I was. For me it meant a re-supply and ride across the river. For them, it was a ride back to Moab and the end to their trip. We shared stories around the campfire for a few hours before calling it a night.

End of Part 3.
See the Full Gallery for Part 3: |
Open full-sized interactive map in a new window: |
Discover more from Across Utah!
Subscribe to get the latest posts sent to your email.

