


Coyote Bridge
![]() approx 14 Miles
approx 14 Miles
one-way
Coyote Gulch is THE classic Escalante canyon and thus deservedly probably the most popular as well. A year-round stream flowing down through an entrenched canyon cascading over multiple waterfalls makes it a main draw in warmer months. Multiple impressive natural spans, evidence of a previous civilization and ample great camping spots make it popular almost year round. In part due to the popularity, it’s now REQUIRED to carry and use WAG BAGS for doing your business in the canyon (despite there being two pit toilets located in the canyon.)
One can hike down canyon and into Upper Coyote Gulch by setting out via the Red Well TH or the Hurricane Wash TH both along the Hole-in-the-Rock Road. Alternately one can begin in Lower Coyote Gulch which can be accessed via the Crack-in-the-Wall TH at the end Forty Mile Ridge Road or via longer thru-hike routes like the Hayduke Trail. A final option is to park at the Water Tank about 2/3 of the way out Forty Mile Ridge Road and either go cross-country to mid-Hurricane Wash or use the scramble route to mid-canyon near Jacob Hamblin Arch (not recommended for beginners or anyone afraid of heights/falling!)
Here is my description headed UP the canyon from the Escalante all the way up to the Hurricane Wash Trailhead. Or, if you plan to hike it the other direction, click here to view the alternate description for those going DOWN Coyote Gulch.
Lower Coyote Gulch
Congratulations you are at the Escalante River and ready to go up an amazing canyon! If you have come down the Escalante, you’ve already marveled at Stevens Arch hanging high above the river and possibly even hiked up the route to get inside the great arch. If you got to this point via Crack-in-the-Wall, take time to go up river a ways to see the incredible view. If time permits even explore around the bend and into Lower Stevens Canyon. There is an alternate route back Lower Coyote if you wish to make a loop and take in an incredible viewpoint across from Stevens Arch. More about this option can be found on the Stevens Arch page.
Digression aside and headed up Coyote Gulch: The stream from Coyote Gulch somewhat unceremoniously meets the Escalante. However, headed upstream the scenery immediately improves as the stream passes towering streaked walls before soon arriving at a rock/log jam which one must get past:
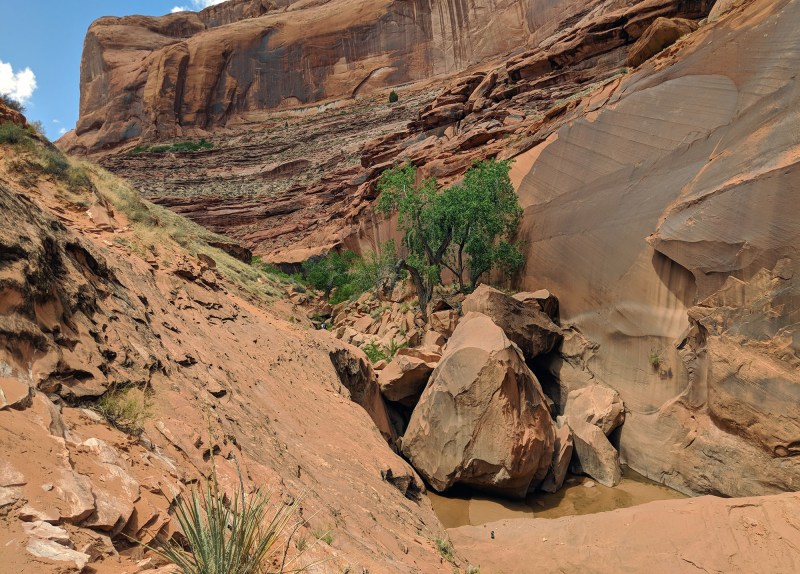
Lower Coyote Gulch obstacle and ledge bypass
There are several ways to do this, but IMHO the best route is immediately on the left (LUC — looking up canyon) by traversing a sloping slickrock ramp up past the obstacle. This method involves a bit of exposure which may give some pause (especially if traversing in wet/slick shoes.) The ledge can be seen above and in more photos in the gallery below. Nearby routes climb higher, but all involve a a tricky spot or two. Those comfortable with walking on slickrock may pass this point without even noticing. Reportedly at times a “rabbit hole” passage allows hikers to go right up through the rock obstacle, but that seemed to no longer be the case in 2018. If one really wants to avoid this spot, it’s possible to take the “high water alternate” route which bypasses lower Coyote Gulch completely and is described on the Stevens Arch page.
Just up from the obstacle one will notice a well-worn route up a sand dune on the left. This is the trail up to the Crack-in-the-Wall exit route which leads to the TH at the end of the Forty Mile Ridge Road. Check out my old video of that route.
Not more than 1/2 mile up canyon one will see a bench with a few cottonwood trees on the right side of the stream which make for a good camp spot. Here one can turn around and see Stevens Arch on the skyline. This is also the location where aforementioned “high water” alternate route connects via the northern side. That route climbs up and follows the Kayenta rock ledges downcanyon to a dramatic view across from the arch as well the less-used route down to the Escalante River via a side canyon to the north.

entrenched Lower Coyote Gulch
After this spot the canyon narrows and bit and becomes strewn with rocks. Signs of floods rushing through the canyon are evident and serve as a reminder one needs to always be aware of current weather conditions (especially those upstream). Camping in the Lower Coyote Gulch is not recommended unless you are well up on a bench.
Soon the canyon begins to widen up a bit and take on a different feel. Ahead you will see a rolling cascade which marks the beginning of the next section of the canyon.
-

- Escalante flows below Stevens Arch
-

- streaked walls along the Escalante
-

- Coyote Gulch ends at Escalante River
-

- Rockfall in Lower Coyote Gulch
-

- Coyote Gulch Ledge
-

- looking down scary ledge
-

- camp near access to Stevens Arch Route
-

- below Stevens Arch
-

- Stevens Arch Alternate Route
-

- Route to Stevens Arch Viewpoint
-

- Across from Stevens Arch
-

- above Lower Coyote Gulch
-

- The Dune seen from Stevens Arch Route
-

- Route through dune to Crack-in-the-Wall
-

- View down from Crack-in-the-Wall
-

- Navigating the Crack-in-the-Wall Exit
-

- Lower Coyote Gulch evidence of flood
-

- entrenched Lower Coyote Gulch
The Waterfall Section

Upper Falls
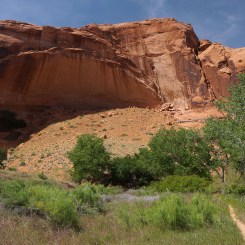
The next section of the canyon is dominated by five waterfalls. The first is more of a cascade really as the stream dances down a sloping incline of exfoliating slickrock. It’s easy to walk up right beside the cascade here. Above the falls one will notice an giant undercut alcove ahead.
The alcove makes for an incredible group camping spot if you are fortunate to get there before others. The area is so popular that there is a pit toilet nearby uphill on the northern side of the canyon across from the alcove. (This toilet is frequently closed though due to overuse — so definitely bring that WAG bag.)
Just around the bend upstream is another fall pouring in from a spring high above on the right wall of the canyon. It doesn’t have as much volume as the falls in the main watercourse, but it’s still a spectacle to behold as the 30′ drop often fills the air with a fine mist of water and thus I call it “Mist Falls“.
Continuing up canyon one soon arrives at the next waterfall. It falls/slides about 10′ over a rounded sandstone outcrop. This is probably the trickiest fall to get around as it requires a short scramble up the rockwall. There are several places to do this, but the easiest in my opinion is back down from the falls around the bend near a tree on the left side (LUC).
Continuing up canyon one quickly arrives at another waterfall. This one leaps about 9′ over the top of a flared sandstone ledge. The cottonwood trees in the background make for a gorgeous scene here in autumn.Use a bypass on the left (LUC) to get past the drop and above the waterfall.
Another bend or so and one will come to the final waterfall in this section and it’s arguably the best of the bunch. The “Upper Falls” sits below Cliff Arch and is the tallest along the main route at about 12′, With several interesting angles to capture, it is a favorite among photographers.
-

- Lower Falls/Cascade | Coyote Gulch ⮞⮞⮞
-

- Undercut Alcove
-

- Undercut Alcove
-

- Lower Pit Toilet
-

- “Mist Falls” | Coyote Gulch ⮞⮞⮞
-

- “Mist Falls “
-

- Third Falls
-

- Third Falls | Coyote Gulch ⮞⮞⮞
-

- Second Falls | Coyote Gulch ⮞⮞⮞
-

- Second Falls
-

- Upper Falls
-

- Upper Falls
Cliff Arch to Hanging Alcoves
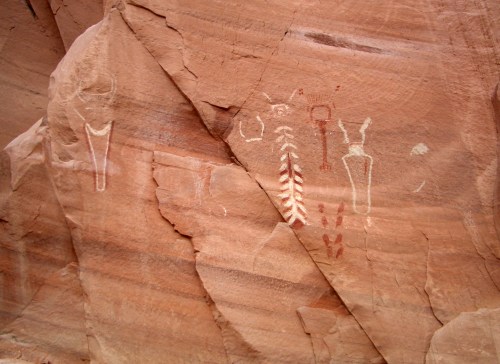
Pictographs
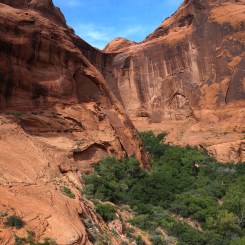
One may continue up canyon by using a bypass around Upper Falls. To get to the bypass one will likely have to backtrack a short ways and find the route on the south side of the canyon. Another option is to back-track a bit and then climb up towards Cliff Arch. Instead of following the stream, it’s possible to exit on the north side and climb up to the saddle of the fin. This is an excellent shortcut and provides an up-close view of Cliff Arch as well as the next section of canyon including the first of several waterfalls. Whether you’ve used the short-cut or the meander, take care is getting back down to stream level below the waterfall. There are several use-trails which ascend/descend here on both sides of the canyon in questionable spots. If in doubt, take your time and explore — there’s always a fairly easy way to be found.
Along the next few bends, interior trails form away from the streams often with good camping spots along the way. One bend up on the left and hidden in the shadows in some brush one will find the “Green Pool“. Farther up an easy-to-miss side canyon enters from the right (LUC). A brushy, splintered side-trail leads one back to what author Allen calls The Black Pool in his guidebook. It’s an amazing pool underneath a mossy overhang.
Back in the main canyon and continuing upstream there will be several hanging alcoves on the northern or right side of the canyon. Some of these include relics of a past civilization. The first one immediately past the side canyon has a good set of pictographs if you are willing to climb up to them. Remember, please don’t touch as the oils from our skin breaks down and destroys this ancient art.
-

- Zoom to the Upper Waterfall
-

- View from Above Coyote Gulch
-

- Same spot in Autumn
-
- Cliff Arch from the short-cut trail
-

- Close up on Cliff Arch
-

- Purple wildflowers and yucca in bloom
-

- Mid-Coyote Gulch with fall colors
-
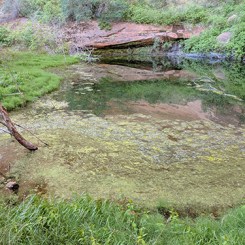
- The “Green Pool”
-

- The Black Pool | Coyote Gulch ⮞⮞⮞
-
- Hanging Alcove with Pictorgraphs
-

- Pictographs | Coyote Gulch ⮞⮞⮞
-

- Indian Relics
Coyote Bridge to Hurricane Wash Junction
Jacob Hamblin Arch (aka Lobo Arch)
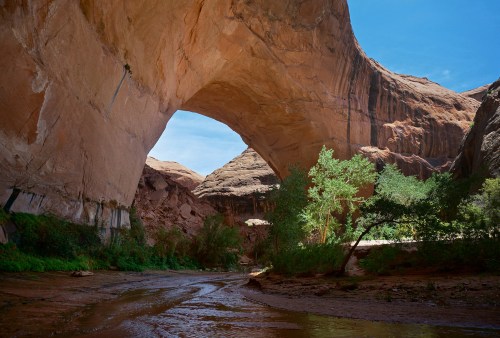
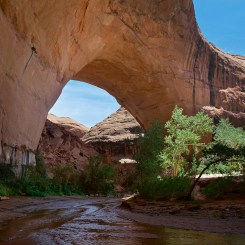
One more bend or so up canyon and one has arrived at Coyote Bridge. In many cases this has become the symbol of this iconic canyon. One walks right under the bridge and can enjoy the different, yet both beautifully unique, views from each side. There is a good camping spot immediately adjacent to the bridge on the downstream side, however I would suggest not camping there unless it’s already late in evening and you plan an early start. IMHO it’s a downer to arrive at an iconic backcountry spot only to find someone’s tent(s) perched right in front!
Just around the next bend is what I call ‘The Notch‘ — a place where the streams cuts a short slot through the sandstone fin of a meander. At times one can simply walk right through this spot in ankle-deep water. At other times it can be chest deep! If progress is blocked for any reason, there is a well-worn bypass trail around the meander to the south.
After another narrow section one comes to a favorite spot for photographers — Swiss Cheese Falls. That’s not an official name and I think it would be hard pressed to really consider this a waterfall, but it’s definitely a photogenic spot none-the-less.
After a few more bends one can see the spectacle that is Jacob Hamblin Arch (originally named Lobo Arch). Its immense size can be startling.
Before getting all the way to the arch there is a small spring on the right and another popular camping spot on the left. There is another pit toilet on the southern wall in this section as well. This is also the spot where a steep route comes down from the rim, providing access to Forty Mile Ridge Road. This route is not for the faint of heart and experience scrambling on slickrock is strongly suggested and probably a rope to haul packs up/down.
Back to Jacob Hamblin, it is possible to climb up and through the arch, but don’t short-cut it entirely and miss the undercut just south of the arch which is probably one of the best around (and a popular camping area.) You’ll need a wide-angle lens to take it all in via camera. The fin which reaches down to this spot provides another route to the top via the northern rim. However this one is even more treacherous than the one down canyon. Though non-technical, this route includes extreme exposure so a rope is suggested and climbing experience mandatory.
NOTE: this entire stretch of the canyon is incredible scenic, but also incredibly crowded at times. On my 2018 I passed through on a weekend in May and counted 50 people camping within this 1/4 mile stretch!
Continuing around to the other side of Jacob Hamblin Arch and the views are even more grand (if that is possible!) This is really the heart of the canyon. The alcove undercuts formed by the meandering stream along this section are incredible and arguably the best of any on the Colorado Plateau (those in Lower Muley Twist are a close second in my book.)
A few more bends up and the canyon walls will begin to diminish somewhat and you’ll see a stream entering from the left. This is the junction of Hurricane Wash.
-

- Below Coyote Bridge in Fall
-

- Coyote Bridge from downstream | Coyote Gulch ⮞⮞⮞
-

- Coyote Bridge from upstream
-

- The ‘Notch’ from downstream
-

- The ‘Notch’
-

- Swiss Cheese Falls
-

- Swiss Cheese Falls | Coyote Gulch ⮞⮞⮞
-

- Swiss Cheese Falls | Coyote Gulch ⮞⮞⮞
-

- Swiss Cheese Falls | Coyote Gulch ⮞⮞⮞
-

- Jacob Hamblin Arch from downstream
-

- The pit toilet (you don’t want to see it open!)
-

- Semi-sketchy route up to Forty Mile Ridge Road
-

- Access to semi-sketchy route up
-

- Undercut south of JH Arch
-

- Giant Undercut — climbers’ route up
-

- HDR of Jacob Hamblin Arch
-
- Jacob Hamblin Arch (aka Lobo Arch)
-

- Under an Overhang
-

- Nice Bends
-

- Upper Coyote Gulch
The Junction to Hurricane Wash TH
From the confluence of Hurricane and Coyote Gulch, to the right (upstream) is the alternate route to this point via the Red Well TH. A short side-hike up this direction will take one to the scenic side canyon known as Sleepy Hollow. This guide will continue up Hurricane Wash however to the left.
The Navajo sandstone walls continue to tower for the next several bends of the canyon. The stream gets smaller and smaller and almost suddenly dries up. The landscape changes drastically from this point up. Though still somewhat entrenched, the canyon is much more barren and much more difficult to walk up the sand/stone-filled dry wash.
After a while the canyon opens up a bit and becomes even more desolate. As one nears the Hole-in-the-Rock Road you might see minor outbreaks for water. Soon you will be at the road and the parking lot at the Trailhead.
-

- Hurricane Wash meets Coyote Gulch
-

- Water begins to flow
-

- Cobble-stone walk
-

- Narrow section in Hurricane Wash
-

- Above Hurricane Wash
-

- Forty Mile Ridge Road
NOTE: if thru-hiking and need water, there is water tank near the cabin just a few hundred yards north of the parking area.
Video Reference:
![]()
Important Waypoints:
- 37.4276° -110.9808° — Coyote Gulch ends at the Escalante River
- 37.4283° -110.9876° — Access to Crack-in-the-Wall Route
- 37.4261° -110.9913° — Access to Stevens Arch Route
- 37.4196° -111.0076° — Cliff Arch
- 37.4175° -111.0212° — The Black Pool
- 37.4163° -111.0277° — Coyote Bridge
- 37.4152° -111.0335° — Swiss Cheese Falls
- 37.4191° -111.0432° — Jacob Hamblin Arch (aka Lobo Arch)
- 37.4204° -111.0581° — Junction of Hurricane Wash and Coyote Gulch
- 37.4065° -111.0867° — Approximate Exit/Entrance Route to The Water Tank TH
- N37.3855° W-111.1324° — Hurricane Wash TH


Do you have any more information on the Water Tank to Hurricane Wash route highlighted yellow in your attached map? I’m not sure how feasible it is to try this route but I’ve been trying to look up more info on it, and can only find it mentioned in this blog post. Climbing down at Jacob Hamblin looks too daunting, but is there really a second option to cut into Hurricane Wash halfway through?
Heya! Sorry, I really don’t. I’ve done it multiple times going a slightly different way each time. It’s all unmarked, but not overly difficult. The more one tries to “shortcut” the route the steeper and more undulating the slickrock. There really are bunch of possible paths and IMHO I’d much rather do this than the climb in/out near the arch (more cool landscape to see and no stress of the climb.)
Thank you for the great information!
Thank you for the post! We are going down the Escalante river.. what is the loop you recommend from the river and back to get to the most places you have mentioned?
You are welcome. Are you floating down the Escalante and not exiting at Coyote? Besides the short “High Route” loop at the very bottom, everything else would need to be done as an up and back hike. Unless going down to Willow, exiting Coyote is probably the best bet.
Hi Jamal, is it possible to go from Hurricane Wash Th to Jacob Hamblin Arch and back in one day? A.
It’s def possible and many do it that way — it’s about 15 miles round-trip. There’s so much more great stuff to see down canyon though, so I’d recommend spending one night if possible. If that’s not an option, maybe try to really push it a few more miles to Coyote Bridge and back.